Delve into the world of paracord, a must-have in every outdoor adventurer’s kit. Whether you’re crafting a survival bracelet or setting up a campsite, mastering the art of accurately cutting paracord is vital. Here, we’ll unveil the techniques and considerations that ensure both functionality and longevity of your paracord after the cut.
Why Cutting Paracord the Right Way Matters
1. Preservation of Integrity
A precise cut ensures that the paracord retains its original strength and structure. Cutting it haphazardly can weaken the fibers, compromising its overall durability and reducing its lifespan.
2. Aesthetics and Crafting
For crafters and artisans, a clean cut is essential for achieving a polished final product. Frayed ends can mar the appearance of crafted items like bracelets or keychains, detracting from their beauty and appeal.
3. Safety Considerations
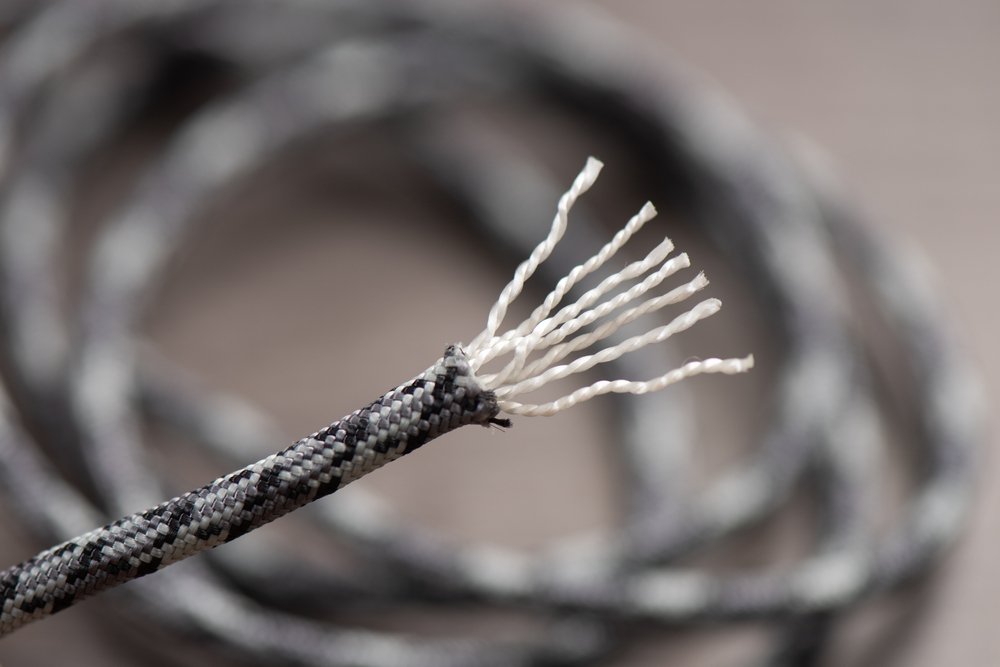
Improperly cut paracord can lead to fraying, which, if unnoticed, might unravel during crucial moments, such as when used in climbing or securing heavy loads. This poses potential safety risks, especially in survival or outdoor scenarios.
- Potential Hazards: Frayed cords can get caught easily, posing entanglement risks.
- Unreliable Knots: Frayed ends might not hold knots securely, leading to them coming undone unexpectedly.
4. Economic Implications
Cutting paracord correctly reduces wastage. When consistently cut improperly, more of the cord is wasted due to fraying or weakening, leading to more frequent replacements and increased costs over time.
Understanding Different Paracord Types Before Cutting
1. Historical Context
The origins of paracord trace back to World War II, where it was used as parachute suspension lines. Its durability and versatility quickly made it a favorite among soldiers. Understanding its history provides insight into its various types and their intended purposes, ensuring optimal use and cutting techniques.
2. Standard 550 Paracord
Often referred to as the “universal cord,” the 550 type is renowned for its 550-pound tensile strength. Recognizing this variant is crucial as it’s commonly used in various applications, from crafting to survival scenarios.
- Composition: Typically consists of seven to nine inner strands, providing its robust strength.
- Popular Uses: Ideal for tasks like securing equipment, crafting bracelets, or building shelters.
- Cutting Considerations: Given its multi-strand nature, ensuring a clean cut prevents fraying and maintains strength.
3. Light-Duty Variants
These types, such as Type I & II, are designed for tasks requiring finesse over brute strength. They’re perfect for lightweight securing or intricate crafting, and understanding their limitations ensures they’re cut and used appropriately.
4. Heavy-Duty and Specialty Cords
Beyond the standard types, there are cords designed for specific tasks, be it heavy-duty lifting or specialized applications like fire resistance.
- Material Enhancements: Some are reinforced with additional strands or materials for added strength.
- Specific Uses: These variants cater to niche requirements, from industrial tasks to specific safety scenarios.
- Cutting Nuances: Given their unique compositions, each type may have specific cutting recommendations to maintain integrity.
5. Elastic and Shock Cords
These stretchable variants are designed to absorb impact and return to their original length. They’re commonly used in applications where elasticity is crucial. Cutting them requires understanding their elastic nature to prevent damage. For a comprehensive guide on handling and cutting elastic and shock cords, check out this detailed article from ParacordPlanet.
6. Importance of Identification
Before making a cut, it’s paramount to identify the type of paracord in hand. Each variant has unique properties, and recognizing them ensures that they’re used optimally and cut in a manner that preserves their inherent qualities.
Step-by-Step Guide to Cutting Paracord
1.Preparation and Safety
Before diving into the cutting process, ensure you have a clean workspace free from obstructions. Safety should be paramount. Wear protective gloves if necessary and keep the paracord stable to avoid accidental slips. Having the right tools, like sharp scissors or a specialized cutter, will also make the process smoother.
2. Measure Twice, Cut Once
It’s an age-old adage that holds true. Before making any cuts, measure the length you need accurately. Use a ruler or measuring tape, and always double-check your measurements. It’s better to spend an extra minute measuring than wasting precious paracord due to a hasty cut. For more tips on accurate measurement techniques, refer to this handy guide on ParacordCraftingTips.com.
3. Choose the Right Cutting Tool
While many tools can cut paracord, some are better suited than others. Scissors are great for quick cuts, but for precision, a sharp knife or specialized paracord cutter is ideal. Ensure the tool is sharp to achieve a clean, fray-free cut.
4. Tension and Stability
Hold the paracord taut between your fingers or use a clamp. A stable and tight cord ensures a straight cut. Avoid pulling too hard, as this might result in an uneven cut when the tension is released.
5. Cutting Technique
Place your tool at the desired cut point, and apply firm, steady pressure. If using scissors, a single, smooth snip is best. For knives or cutters, a gentle sawing motion might be needed. Always cut at a perpendicular angle to the cord for a straight edge.
6. Preventing Fraying
Once cut, the ends of the paracord might start to fray. To prevent this, quickly melt the ends using a lighter. Hold the flame close, but not directly on the cut end, until it starts to melt. Then, using gloves or a tool, press the end to seal it.
7. Storage and Maintenance
After cutting, store the remaining paracord in a cool, dry place, away from direct sunlight. Regularly inspect and maintain your cutting tools to ensure they remain sharp and rust-free, ready for the next project. Proper storage and tool care will ensure you get the most out of your paracord in future endeavors.
Caring for Your Paracord After Cutting

1. Sealing the Ends
Once you’ve made a cut, the exposed ends of the paracord are prone to fraying. To prevent this, it’s essential to seal them promptly. Using a lighter, gently melt the cut ends until they start to fuse. Then, with caution, press the melted end (using a metal tool or gloved finger) to create a sealed tip. This not only prevents fraying but also gives a neat finish.
2. Proper Storage
Storing your paracord correctly is crucial to maintain its integrity. Keep it in a cool, dry place, preferably coiled or wound up to prevent tangling. Avoid direct sunlight, as prolonged UV exposure can weaken the fibers and fade its color over time.
3. Regular Inspection
Even after cutting and sealing, it’s a good practice to periodically inspect your paracord for signs of wear, fraying, or damage. This ensures that when you need it next, it’s in optimal condition and ready for use.
4. Cleaning and Maintenance
Dirt and grime can accumulate on your paracord, affecting its durability.
- Hand Wash: Use mild soap and lukewarm water to gently clean the cord. Avoid harsh chemicals or detergents.
- Drying: Lay it flat to dry in a shaded area. Avoid hanging as it might stretch the cord.
- Avoiding Abrasives: Steer clear of abrasive surfaces or materials that might cause unnecessary wear or fraying.
5. Educate and Share
As you learn more about caring for your paracord, share this knowledge with fellow enthusiasts. Joining online forums, attending workshops, or simply discussing with friends can provide additional tips and tricks, ensuring everyone gets the most out of their paracord. For a community of like-minded individuals and a wealth of shared knowledge, visit the Paracord Community Forum here.
Troubleshooting Common Cutting Mistakes

1. Dealing with Frayed Ends
One of the most common issues after cutting is fraying. This not only looks untidy but can also weaken the cord. To address this, gently melt the frayed ends with a lighter and press them (using a metal tool or gloved finger) to seal. This restores the neat appearance and prevents further fraying.
2. Uneven Cuts
Sometimes, the cut might not be straight or even. This can be due to using blunt tools or not maintaining proper tension while cutting.
- Sharp Tools: Always ensure your cutting tool, whether scissors or a knife, is sharp. Regularly sharpen or replace blades as needed.
- Stable Surface: Use a stable surface for cutting and ensure the paracord is taut.
- Guidelines: Use a ruler or straight edge as a guide to ensure a straight cut.
- Practice: If you’re new to cutting paracord, practice on smaller pieces until you get the hang of it.
- Re-Cut: If the cut is uneven, measure again and re-cut to achieve the desired length and straight edge.
3. Melted Too Much
Overzealous melting can cause the paracord to become too fused or create a bulky end. If this happens, let it cool, then cut off the overly melted section and reseal properly, ensuring you melt just enough to prevent fraying.
4. Cutting the Wrong Length
Mistakes in measurement can lead to cutting a shorter or longer piece than needed.
- Double-Check: Always measure twice before cutting. Use a reliable measuring tape or ruler.
- Marking: Mark the desired cut point with a pen or chalk for accuracy.
- Extensions: If you’ve cut it too short, consider using connectors or joining techniques to extend the length.
- Repurpose: If an extension isn’t feasible, repurpose the cut piece for another project or task.
- Documentation: Keep a record of common lengths you use for projects to avoid repeated mistakes.
5. Not Accounting for Shrinkage
Some paracord types can shrink over time or when exposed to moisture. Always account for potential shrinkage by cutting a slightly longer length than needed. This ensures you have enough cord even if some shrinkage occurs.
FAQ
Q1: What’s the difference between paracord 550 and paracord MIL-C-5040H in terms of cutting difficulty?
A: While both are durable, the MIL-C-5040H, being military-spec, tends to be denser. This may require sharper tools and more caution during the cutting process.
Q2: How can I ensure a straight cut every time?
A: Using a sharp tool, marking the cut point clearly, and maintaining steady hands are key. You can also invest in specialized paracord cutting tools for better results.
Q3: Why is it important to seal the edges after cutting?
A: Sealing the edges prevents fraying, which can weaken the paracord over time. It also ensures a cleaner appearance and prolongs the lifespan of the cord.
Q4: Can I use regular scissors to cut paracord?
A: While it’s possible to use scissors, it’s recommended to use a sharp knife or a specialized paracord cutter for a cleaner and more precise cut.
Q5: How often should I replace my cutting tools for optimal precision?
A: The frequency depends on usage. Regularly inspect your tools for dullness or damage. If cutting becomes challenging or yields frayed ends, it’s time to sharpen or replace your tool.
Q6: Are there different techniques for cutting thicker paracords, like the paracord 750 type IV?
A: Thicker paracords, like the 750 type IV, may require more force and a sharper blade. It’s advisable to use a steady hand, mark your cut point, and employ a swift, single motion to ensure a clean cut.
Conclusion
Mastering the art of cutting paracord is an indispensable skill for any outdoor enthusiast or craftsman. By ensuring precise cuts and proper sealing techniques, you can retain the strength and reliability that paracord is celebrated for. As you continue to work on your craft and projects, keep in mind the variety and functionality of the paracord types available. If you’re keen on diving deeper into advanced techniques or exploring more specialized tools, be sure to check out our comprehensive guide on outdoor survival tools here. Equip yourself with knowledge and the right tools, and you’re on your way to mastering the vast world of paracord.

